
Modulo De Control Para Lampara. Controlador De Lampara
Hasta 12 cuotas
¡Última disponible!
+100 ventas
Compra ProtegidaSe abrirá en una nueva ventana, recibe el producto que esperabas o te devolvemos tu dinero.
Información sobre el vendedor
- 100%
de compradores lo recomiendan
- 14 años
vendiendo en Mercado Libre
- 443
ventas concretadas
Garantía
Compra Protegida con Mercado Pago
Recibe el producto que esperabas o te devolvemos tu dinero


Características del producto
Características principales
Fabricante | X-10 Powerhouse |
|---|
Descripción
AUTOMATIZACION DE LUCES EN SU HOGAR
Equipo: Modulo para control de lampara
Marca: X-10 Powerhouse
Modelo: LM465
Procedencia: USA
HOW IT WORKS:
The X10 LM465 Lamp Module, is a specialized home automation module with the ability to turn a light source on and/or off, and also the ability to dim or brighten a lampshade, even if the lampshade cannot do this on its own. To use the X10 LM465 Lamp Module, simply plug your lampshade into it, then plug the module into the electrical outlet on the wall.
A X10 LM465 Lamp Module will not do anything by itself but like most X10 modules you will need other X10 devices to interact with it.
At a minimum you would need a X10 TM751 Transceiver and a X10 HR12A PalmPad Remote. The X10 HR12A PalmPad Remote sends RF signals to the X10 TM751 Transceiver which in turn sends these signals across the powerline to the X10 LM465 Lamp Module. These signals can be as easy as on/off or they might be turn it on and then dim 50%.
The nice thing about the X10 TM751 Transceiver and X10 HR12A PalmPad Remote is that they can also control up to 15 other devices so if you want to control another lamp with another X10 LM465 Lamp Module you only have to purchase an additional X10 LM465 Lamp Module and not the X10 TM751 Transceiver and X10 HR12A PalmPad Remote.
HOW TO INSTALL X10 LAMP MODULES (Model LM465):
An X10 Lamp Module provides one of the most basic ways to automate lighting in your home. The module plugs into a standard 110 VAC power outlet, and an incandescent lamp plugs into the module. Once installed, the module is controlled with an X10 controller. You can easily install X10 lamp modules in five simple steps.
IMPORTANT: Before you install X10 lamp modules, you?ll need to have an X10 controller. The X10 Mini Controller (MC10A) and the X10 Palm Pad Controller (HR12A) are both quite popular and inexpensive.
5 Steps to Install X10 Lamp Modules
Once you?ve followed these instructions, you?ll be able to control a plug-in lamp with a remote!
Step 1
Choose an X10 module that is rated for the lamp you will be controlling. For example, if your lamp uses a 60 Watt light bulb, then you need a lamp module that supports 60 Watts or more. Your best bet is the LM465 model, which is the most widely available X10 Plug-In Lamp Module. It supports up to 300 Watts.
Step 2
Plug your lamp into the X10 Lamp Module, and then plug the module into a power outlet. Now you?re ready to program the module to allow communication with your X10 controller.
Step 3
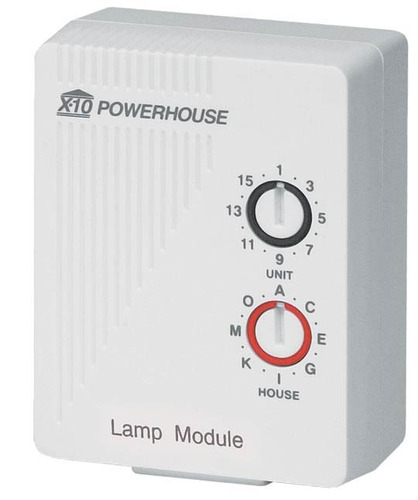
When you install X10 lamp modules, you need to set two different codes (HOUSE and UNIT) on each module. The module has two recessed dials to set these codes. The dials can be turned with a straight-edge screwdriver.
IMPORTANT: Make sure the module is turned OFF during programming.
Set the Codes:
Set the HOUSE Code (Red) to one of the 15 alphabetic codes (A-P). (If you?re adding the module to an existing X10 controller, set the HOUSE code to match your controller?s HOUSE code.)
Set the UNIT Code (Black) to one of the 16 numeric codes. (Each X10 device that you connect to your controller must use a unique UNIT code.)
Step 4
Plug your X10 controller into a different power outlet, and set its HOUSE code to match your module?s HOUSE code. This is accomplished through the same type of dial as the module?s dial. Once the module and controller are both plugged in, and their HOUSE codes are matched, the two devices can communicate with each other over your home?s power lines.
Step 5
Toggle the Lamp Module?s on/off switch to the ON position, and use your X10 controller to turn the plugged in lamp on/off remotely!
SPECIFICATIONS:
Description: The X10 Lamp Module is the simplest and most effective way to control your household incandescent lights. Lighting control is simply a plug-in
away. The X10 Lamp Module plugs into any standard 120V household outlet and gives you the ability to remotely control any incandescent light you plug into the
Module (up to 300 watts). The Lamp Module is actually a Receiver that Responds to X10 Signals generated by X10 Controllers elsewhere on the electrical
power lines. Simply dial in any House Code and Unit Code you choose for each Module and away you go! Don't worry about losing manual control of the lamp...
it will function normally even with the Module in place. The Lamp Module is the foundation of your home lighting system.
LM465: NON-AGC Lamp Module principal advantage is greater sensitivity to the X10 Command Signal in an installation where electronic interference is low.
Suggestion: always keep one of each Module in your supply, as one may perform better than the other based on the installations ability to propagate
the X10 Command versus electronic noise interference.
Note: LOCAL CONTROL; The Lamp Module can "Sense" if any load is plugged into it. When the lamp on/off switch is toggled to the On position, the Module
responds by turning ON the lamp connected to it.
Specific Requirements: 120VAC / 300W
Minimum Load = 40W Lamps rated below 40W may flicker and/or operate erratically.
Lamp Modules must not be used to control appliances or fluorescent lamps
Optional / Supplementary Devices & Modules:
MC10A Desk-top, Plug-in Mini-Controller, PHK05 RF Wireless Handheld Remote Kit, MT13A Desk-top, Plug-in Mini-Timer.
X10 Protocol: House Code Dial - Letters A-P, Default "A" Unit Number Dial - Numbers 1-16, Default "1"
Each X10 Receiver Module is set to a unique Unit Number or to an identical Unit Number as desired.
Each X10 Controller operating a specific set of Receiver Modules must be set to the same House Code as the Receivers they are controlling.
Responds to ALL LIGHTS ON Command
Electrical Protocol:
Nearly all residential homes are wired SPLIT-PHASE. Each 120V Phase is NOT directly connected with the other 120V phase. If after installation, an X10
Receiver does not respond to a remote Controller, then check to ensure that the breaker serving the X10 Receiver is on the same phase as the Controller. If not,
the breaker can be changed to the opposite phase. An alternative solution is recommended, to install a Phase Coupler for improving remote communications
throughout the home.
Setting the LM465 Address Code:
Using a small screwdriver set the House Code Wheel (RED) to the setting that matches an X10 PRO controller (A-P). Then Set the Unit Code Wheel
(BLACK) to the desired number address (1-16).
Installation:
1. Plug the Lamp Module into any wall outlet, adhering to the above stated Electrical Protocol.
2. Plug the Light, to operate, into the Module bottom outlet. Be sure the Light is turned-on, if it has a switch.
3. The Light will turn-on immediately.
4. Send an X10 OFF command to turn it OFF. Installation complete.
Preguntas y respuestas
¿Qué quieres saber?
Pregúntale al vendedor
Nadie ha hecho preguntas todavía. ¡Haz la primera!